It's Black Friday and time for my annual tradition: to stay home all day and avoid the stores.
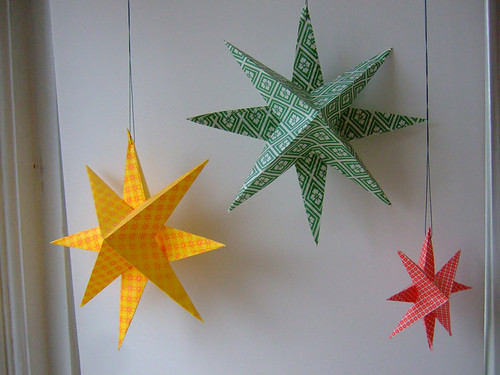
After cleaning up the dishes from yesterday's feast, here's something simple to make in order to add a festive decoration to highlight the season. Who doesn't like an easy to make paper star? As with all simple crafts, they usually look great in a cluster and this star is perfect for hanging with others of different sizes and colors. You likely have the material at home if you use recycled paper. And kids love to do them without much adult help. Here's how to make your own:

Materials:
- origami paper or other square paper (mine was approx. 6")
- pencil
- scissors
- glue
- string to hang hem
How to:
Just follow the directions in the picture tutorial below.
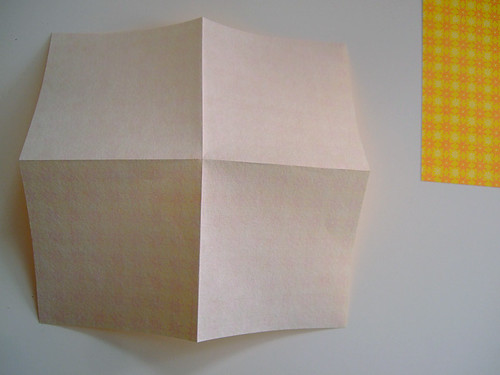
Turn the paper over and fold as in the picture below.
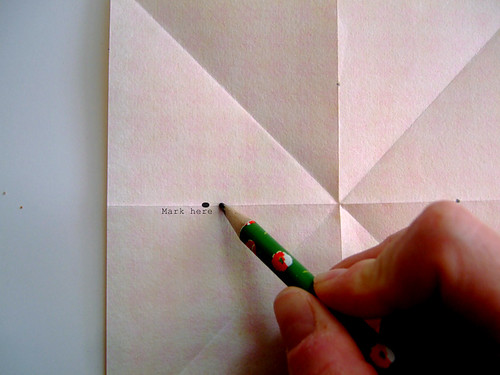
Mark with a pencil a little less from the border to the middle. Do it on all four sides.
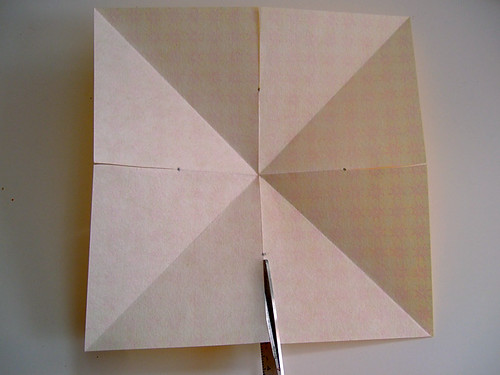
Cut with scissors from the edge to your pencil mark on all four sides.
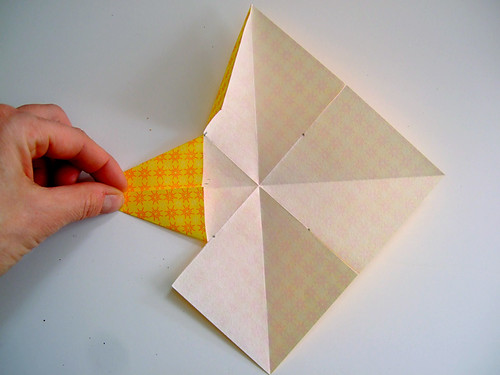

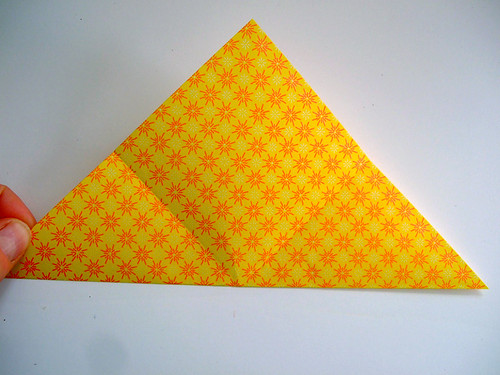
Glue every other side on the folded flaps.

Pull the unglued side over the glued side.
- origami paper or other square paper (mine was approx. 6")
- pencil
- scissors
- glue
- string to hang hem
How to:
Just follow the directions in the picture tutorial below.
Turn the paper over and fold as in the picture below.
Mark with a pencil a little less from the border to the middle. Do it on all four sides.
Cut with scissors from the edge to your pencil mark on all four sides.
Glue every other side on the folded flaps.
Pull the unglued side over the glued side.
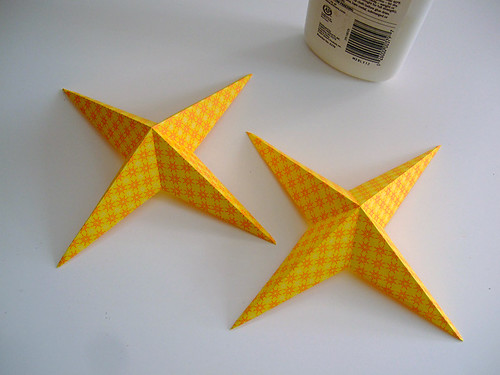
One side is ready, but you need one more to complete the star.
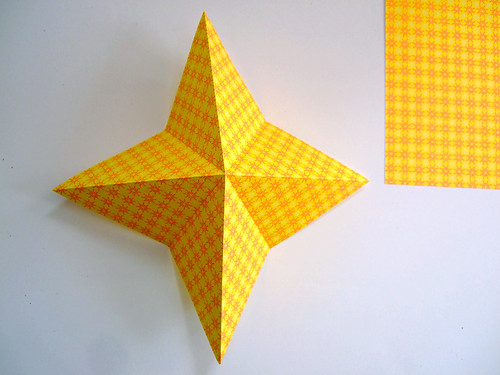
Repeat previous steps to make another star.

Glue as shown.

The glue is missing in this image, but this is the way to attach the 2 stars together.
Repeat previous steps to make another star.
Glue as shown.
The glue is missing in this image, but this is the way to attach the 2 stars together.
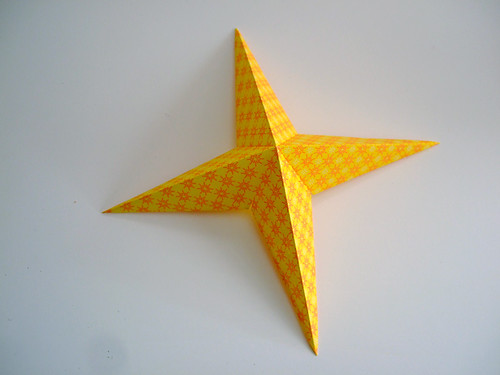
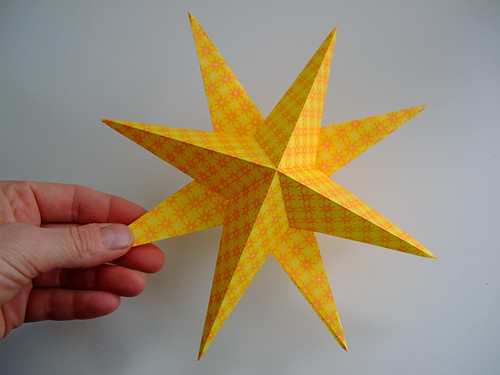
And this is how it looks, when it's complete. Isn't that easy?
I like mine so much that I actually haven't taken them down from last year. If you use cheerful paper, they look good all year round.
Variations:
Make stars of different colors and sizes. Cut one sheet of origami paper in four squares and make 2 small stars.
Make an enormous star as a focal point from just white paper.
Use printed paper from magazines or newspapers.
Make a star mobile using small stars, twigs and thread.
Use paint or glitter glue.
Enjoy and explore.
Thank you! What a wonderful idea! Lots of love, Amanda xxx
ReplyDeleteI love this idea, and I have lots of origami paper on hand. Thanks!
ReplyDeleteGreat - I think I know what we'll be doing tomorrow morning! Thank you, for such a lovely tutorial.
ReplyDeleteJannette.
Thank you for sharing! This looks lovely and so easy!
ReplyDeleteJille x
Thank you very much !! I will try that tomorrow with my girls to get in an advent feeling.
ReplyDeleteGreetings from Spain!!!
I love the origami stars, thanks for the tutorial.
ReplyDeleteHave a nice weekend.
grt, Helmi
Thank you for reminding me of those. I made them as a teenager of gold paper for the Christmas tree, and had forgotten all about them.
ReplyDeletethank you. i made one from newspaper. i double layered it since newspaper is so thin. it's already hanging under the mantle and i love it.
ReplyDeleteThese are wonderful. thanks.
ReplyDeletebeautiful! definitely making this when I get home and get a hold of my scrapbook paper. I think I'll make them in a few different sizes and hang them in a window.
ReplyDeleteWonderful! Easy to follow too- thanks for your simple inspiration, I really appreciate it. Hope your holiday weekend is spent creating lots of great things!
ReplyDeleteGreat fun...but you forgot to say how addictive making these lovely creations is. Jackie
ReplyDeleteSo awesome! I will definitely make some!
ReplyDeletelove it. will do.
ReplyDeletesuper. easy!
ReplyDeleteEVERY single person I know is getting one of these tied with tender loving care to their Christmas present. They have no choice. I have an obligation to give people awesome things.
Thanks, Kathrin!
This is just superb tutorial! I made couple of wonderful stars with different sizes yesterday...and today I am doing some more.
ReplyDeleteWhat a great idea to give for christmas present, made with love. You have a beautiful blog. I have just startet my own blog about interior, this was really a blog to look into. Thank you: )
ReplyDeleteWho are you?! All these marvelous ideas and recipes and things full of meaning!? Just terrific!
ReplyDeleteThank you. I look forward to making some stars to hang from a branch in my living room during the holidays. Love the stars and the heart garland is fabulous. Thank you for sharing!
ReplyDeleteThank you for sharing such a simple and lovely way to make stars. You have so many great ideas and are always generous about sharing them!
ReplyDeleteSüpppperrr...
ReplyDeleteLove it!! I'll try it :)
ReplyDeleteFabulous - we are definitely going to try these. I've featured your excellent tutorial on my blog today.
ReplyDeleteHi !
ReplyDeleteI love your idea is wonderful!!!!
I have make my own stars and share on my blog :)
I hope you like it!
Clever, Clever, Clever!
ReplyDeleteThank you, and very very nice. :)
ReplyDeleteI made three. There are pictures on my blog, with a link to your tutorial.
I made some with pictures on my blog and a link back here. I also thought of stacking the individual sides to make a tree. I took pictures of that as well.
ReplyDeleteI really love these stars. I made little ones and sewed them onto hair clips and a pin, so now I can take them with me everywhere. Thank you for sharing!
ReplyDeleteThank you for this great tutorial! I might have to give it a try!
ReplyDeleteHello Anne!
ReplyDeleteI loved the step by step this star ...
genial, was time I needed to do one and I could not do, and put on the blog. ok?
Hugs dear ... Fatima Helena - Brazil.
That´s a good idea!
ReplyDeletethanks! i'm linking back in tomorrow's post at deze is ook leuk
ReplyDeletekind regards, Dymphie
hört sich gut an, ich war auf der suche nach guten ideen für weihnachten und da habe ich sie hier gefunden, 1000 dank!
ReplyDeleteHello! I love the star, and it so easy to make. Thanks for sharing with us.
ReplyDeleteMaking them for the Teen Room at my job (the public library)! Was really cool, and super easy! Even for a non-crafty guy like myself. Thanks loads for the tutorial!
ReplyDeleteso nice!! i want also try :) thanks for sharing!!
ReplyDeleteThis is lovely! The stars are very pretty, and your tutorial is perfect: crisp, clear pictures and straightforward instructions. Thank you for posting it!
ReplyDeleteThanks for the tutorial! Ive already made some as a trial run and am thinking about making some as decorations for the entry way at my wedding! They're perfect :)
ReplyDeleteWanted you to know I posted a link to this tutorial today on my blog.
ReplyDeleteNancy Ward
PaperFriendly
http://www.nancywardcrafts.com
Wanted you to know I posted a link to this tutorial yesterday on my blog.
ReplyDeleteNancy Ward
PaperFriendly
http://www.nancywardcrafts.com
The stars look fantastic.
ReplyDeleteI made them and now they are hanging in our nursery! Thank you for sharing these!
ReplyDeleteI used your tutorial to create my xmas wreath blogged here... http://fraggierocks.blogspot.com/2011/10/christmas-star-wreath.html
ReplyDeleteI spotted your lovely tutorial over at http://www.crafteroo.co.uk in a post from last year. x
Great tutorial. Thank you for sharing.
ReplyDeleteADOREI..PARABÉNS...OBRIGADA..BEIJOS.ETÉLIA.
ReplyDeleteSupre cute - thanks for posting! I've made a couple, but I'm having trouble getting the glue to stick the 2 halves together. Any tips or tricks for that part? Thanks!
ReplyDeleteJ'adore!! I like que de patience !!! bravo!!
ReplyDeleteThey look great!!
ReplyDeleteI´ll try to do some this weekend:)
Marie (Sweden)
Thank you for the stars!!
ReplyDeleteJust great!!
- Cheers Gisela.
Thank You So Much For Posting This...
ReplyDeleteThis Is An Awesome Idea...
Jessica (Las Vegas)
Thank you! I love this!!!
ReplyDeleteThank you! the kids and i will love doing this together! t.xoxo
ReplyDeleteI just made them to decorate the door of my apartment!
ReplyDeletefunny, i don't remember using scissors when gluing? but then i haven't been to kindergarten in decades. ;)
ReplyDeletethanks for reminding me to make 'em more 3-d!
Wow, I love these. Simple but pretty! Thanks so much! I'm planning to make a few with my girls when we do some snowflakes.
ReplyDeleteThanks so much for the tutorial! Here's my attempt, and a shout out to you!
ReplyDeletehttp://www.flickr.com/photos/melissaellos/6467716501/in/photostream/
This is a great tutorial, thank you for sharing!
ReplyDeletePirjo (Finland)
Too cute. Thank you for the tutorial
ReplyDeletelovely ,lovely lovely ....excellent DIYS.i am going to make them and also blog about you and the stars.is it ok dear..i am the new follower from Celebrations Decor
ReplyDeleteThank you!! This is beautiful and looks amazing with the Christmas Scrapbook paper I have on hand. You've got a new follower in me :)
ReplyDeleteLovely! Luv your work! I luv hand made anything. My father was Czeck born. Went there last year to take his ashes. (LIBEREC).
ReplyDeleteHe taught me many handcrafts.
Will u please forward me all your work in future?
ReplyDeleteMy email: labindeman@gmail.com
Thank you for good and complete instructions! I have a printed tutorial that isn’t clear in directions towards the end. I watched a video by someone else. It was fast and left out the step on how to attach them. This is very helpful. It’s frustrating to spend money, then struggle to complete a craft. I’m glad I kept searching and found your tutorial.
ReplyDelete